Deploy Mattermost on Linux
Mattermost Server can be deployed on Linux in two broad ways: as a package-based install on a host you manage, or as a managed cloud marketplace deployment that provisions a production-ready stack in your own cloud account.
For package-based installs (Manual Install, Ubuntu, RHEL/CentOS), we don’t recommend deploying Mattermost Server and the database on the same system in production. These options are best suited to development and testing. The cloud marketplace options provision a separated production stack designed to scale.
Choose your preferred option below for specific deployment instructions:
Minimum system requirements:
- Hardware: 1 vCPU/core with 2GB RAM (support for up to 1,000 users)
- Database: PostgreSQL v14+
- Network:
- Application 80/443, TLS, TCP Inbound
- Administrator Console 8065, TLS, TCP Inbound
- SMTP port 10025, TCP/UDP Outbound
You can install the Mattermost Server on any 64-bit Linux system using the tarball. This is the most flexible installation method, but it comes with the highest effort, typically favored by advanced system administrators.
This Mattermost deployment includes the following steps: install PostgreSQL database, prepare the database, download the Mattermost server, install the server, and set up the server.
Step 1: Install PostgreSQL database or get database connection credentials
Install PostgreSQL locally on the same server by following the PostgreSQL installation documentation.
Use an external PostgreSQL database server. Ensure you have connection credentials, including hostname, port, database name, username, and password available.
Use a managed database service.
Step 2: Prepare the database
Follow the database preparation documentation to set up your PostgreSQL database for Mattermost.
Step 3: Download
In a terminal window, ssh onto the system that will host the Mattermost Server. Using wget, download the Mattermost Server release you want to install using one of the following commands. Replace amd64 with the appropriate architecture (e.g., arm64 for ARM-based systems) in the link as needed.
wget https://releases.mattermost.com/11.9.0/mattermost-11.9.0-linux-amd64.tar.gz
wget https://releases.mattermost.com/11.7.7/mattermost-11.7.7-linux-amd64.tar.gz
If you are looking for an older release, Enterprise and Team Edition releases can be found in our version archive documentation.
Step 4: Install Mattermost server
Install the Mattermost Server by extracting the tarball, creating users and groups, and setting file/folder permissions.
First extract the tarball:
tar -xvzf mattermost*.gz
Move the entire folder to the
/optdirectory (or whatever path you require):
sudo mv mattermost /opt
Create the default storage folder. By default the Mattermost Server uses
/opt/mattermost/dataas the folder for files. This can be changed in the System Console during setup (even using alternative storage such as S3):
sudo mkdir /opt/mattermost/data
Note
If you choose a custom path, ensure this alternate path is used in all steps that follow.
Set up a user and group called
mattermost:
sudo useradd --system --user-group mattermost
Note
If you choose a custom user and group name, ensure it is used in all the steps that follow.
Set the file and folder permissions for your installation:
sudo chown -R mattermost:mattermost /opt/mattermost
Give the
mattermostgroup write permissions to the application folder:
sudo chmod -R g+w /opt/mattermostYou will now have the latest Mattermost Server version installed on your system. Starting and stopping the Mattermost Server is done using
systemd.
Create the systemd unit file:
sudo touch /lib/systemd/system/mattermost.service
As root, edit the systemd unit file at
/lib/systemd/system/mattermost.serviceto add the following lines:
[Unit]
Description=Mattermost
After=network.target

[Service]
Type=notify
ExecStart=/opt/mattermost/bin/mattermost
TimeoutStartSec=3600
KillMode=mixed
Restart=always
RestartSec=10
WorkingDirectory=/opt/mattermost
User=mattermost
Group=mattermost
LimitNOFILE=49152

[Install]
WantedBy=multi-user.target
Note
If you are installing the Mattermost server on the same system as your database, you may want to add both
After=postgresql.serviceandBindsTo=postgresql.serviceto the[Unit]section of the systemd unit file.
Save the file and reload systemd using
sudo systemctl daemon-reload. Mattermost Server is now installed and is ready for setup.
Step 5: Set up the server
Before you start the Mattermost Server, you need to edit the configuration file. A default configuration file is located at /opt/mattermost/config/config.json. We recommend taking a backup of this default config ahead of making changes:
sudo cp /opt/mattermost/config/config.json /opt/mattermost/config/config.defaults.json
Configure the following properties in this file:
Under
SqlSettings, setDriverNameto"postgres". This is the default and recommended database for all Mattermost installations.Under
SqlSettings, setDataSourceto"postgres://mmuser:<mmuser-password>@<host-name-or-IP>:5432/mattermost?sslmode=disable&connect_timeout=10"replacingmmuser,<mmuser-password>,<host-name-or-IP>andmattermostwith your database name.Under
ServiceSettings, set"SiteURL": The domain name for the Mattermost application (e.g.https://mattermost.example.com).
We recommend configuring the Support Email under SupportSettings, set "SupportEmail". This is the email address your users will contact when they need help.
After modifying the config.json configuration file, you can now start the Mattermost server:
sudo systemctl start mattermost
Verify that Mattermost is running: curl http://localhost:8065. You should see the HTML that’s returned by the Mattermost Server.
The final step, depending on your requirements, is to run sudo systemctl enable mattermost.service so that Mattermost will start on system boot.
Step 6: Update the server
Updating your Mattermost Server installation when using the tarball requires several manual steps. See the upgrade Mattermost Server documentation for details.
Remove Mattermost
To remove the Mattermost Server for any reason, you must stop the Mattermost Server, back up all important files, and then run this command:
sudo rm -rf /opt/mattermost
Note
Depending on your configuration, there are several important folders in /opt/mattermost to backup. These are config, logs, plugins, client/plugins, and data. We strongly recommend you back up these locations before running the rm command.
You may also remove the Mattermost systemd unit file and the user/group created for running the application.
Minimum system requirements:
- Operating System: 20.04 LTS, 22.04 LTS, 24.04 LTS
- Hardware: 1 vCPU/core with 2GB RAM (support for up to 1,000 users)
- Database: PostgreSQL v14+
- Network:
- Application 80/443, TLS, TCP Inbound
- Administrator Console 8065, TLS, TCP Inbound
- SMTP port 10025, TCP/UDP Outbound
You can deploy Mattermost server using our .deb signed packages using the Mattermost PPA (Personal Package Archive). This is the quickest way to install a Mattermost Server that provides automatic updates. This install method is used for both single and clustered installations, as you can tools like Packer for a clustered deployment.
This Mattermost deployment includes the following steps: install PostgreSQL database, prepare the database, add the PPA repository, install Mattermost server, configure the server, and update the server.
Step 1: Install PostgreSQL database or get database connection credentials
Mattermost requires a PostgreSQL database. You can either:
Install PostgreSQL locally on the same server by following the PostgreSQL installation documentation.
Use an external PostgreSQL database server. Ensure you have connection credentials, including hostname, port, database name, username, and password available.
Use a managed database service.
Step 2: Prepare the database
Follow the database preparation documentation to set up your PostgreSQL database for Mattermost.
Step 3: Add the Mattermost Server PPA repository
Important
The GPG public key has changed. You can import the new public key or run the automatic Mattermost PPA repository setup script provided below. Depending on your setup, additional steps may also be required, particularly for installations that didn’t rely on the repository setup script. We recommend deleting the old key from /etc/apt/trusted.gpg.d before adding the apt repository.
For Ubuntu Jammy - 22.04 LTS and Ubuntu Noble - 24.04 LTS:
sudo rm /usr/share/keyrings/mattermost-archive-keyring.gpgcurl -sL -o- https://deb.packages.mattermost.com/pubkey.gpg | gpg --dearmor | sudo tee /usr/share/keyrings/mattermost-archive-keyring.gpg > /dev/null
In a terminal window, run the following repository setup command to add the Mattermost Server repositories:
curl -o- https://deb.packages.mattermost.com/repo-setup.sh | sudo bash -s mattermost
This command configures the repositories needed for a PostgreSQL database, configures an NGINX web server to act as a proxy, configures certbot to issue and renew the SSL certificate, and configures the Mattermost repository so that you can run the install command.
Step 4: Install Mattermost server
Ahead of installing the Mattermost Server, it’s good practice to update all your repositories and, where required, update existing packages by running the following command:
sudo apt update
After any updates and system reboots are complete, you can install the Mattermost Server by running:
sudo apt install mattermost -y
You now have the latest Mattermost Server version installed on your system.
The installation path is /opt/mattermost. The package will have added a user and group named mattermost. The required systemd unit file has also been created but will not be set to active.
Note
Since the signed package from the Mattermost repository is used for mulitple installation types, we don’t add any dependencies in the systemd unit file. If you are installing the Mattermost server on the same system as your database, you may want to add both After=postgresql.service and BindsTo=postgresql.service to the [Unit] section of the systemd unit file.
Step 5: Configure the server
Before you start the Mattermost Server, you need to edit the configuration file. A sample configuration file is located at /opt/mattermost/config/config.defaults.json.
Rename this configuration file with correct permissions:
sudo install -C -m 600 -o mattermost -g mattermost /opt/mattermost/config/config.defaults.json /opt/mattermost/config/config.json
Configure the following properties in this file:
Under
SqlSettings, setDriverNameto"postgres". This is the default and recommended database for all Mattermost installations.Under
SqlSettings, setDataSourceto"postgres://mmuser:<mmuser-password>@<host-name-or-IP>:5432/mattermost?sslmode=disable&connect_timeout=10"replacingmmuser,<mmuser-password>,<host-name-or-IP>andmattermostwith your database name.Under
ServiceSettings, set"SiteURL": The domain name for the Mattermost application (e.g.https://mattermost.example.com).
We recommend configuring the Support Email under SupportSettings, set "SupportEmail". This is the email address your users will contact when they need help.
After modifying the config.json configuration file, you can now start the Mattermost Server:
sudo systemctl start mattermost
Verify that Mattermost is running: curl http://localhost:8065. You should see the HTML that’s returned by the Mattermost Server.
The final step, depending on your requirements, is to run sudo systemctl enable mattermost.service so that Mattermost will start on system boot.
Note
The value of the sslmode property in the DataSource configuration is entirely dependent on your native environment. Please consult the native environment setup documentation for guidance on its value. The available options for sslmode are disable or require. For example, if you are using Amazon Lightsail as your data source, you must set sslmode to require to successfully connect to the database.
Step 6: Update the server
When a new Mattermost version is released, run: sudo apt update && sudo apt upgrade to download and update your Mattermost instance.
Note
When you run the sudo apt upgrade command, mattermost-server will be updated along with any other packages. We strongly recommend you stop the Mattermost Server before running the apt command using sudo systemctl stop mattermost.
Remove Mattermost
Run the following command to remove the Mattermost Server:
sudo apt remove --purge mattermost
Minimum system requirements:
- Operating System: Enterprise Linux 7+, Oracle Linux 6+, Oracle Linux 7+
- Hardware: 1 vCPU/core with 2GB RAM (support for up to 1,000 users)
- Database: PostgreSQL v14+
- Network:
- Application 80/443, TLS, TCP Inbound
- Administrator Console 8065, TLS, TCP Inbound
- SMTP port 10025, TCP/UDP Outbound
This Mattermost deployment includes the following steps: install PostgreSQL database, prepare the database, download the Mattermost server, install the server, set up the server, and update the server.
Step 1: Install PostgreSQL database or get database connection credentials
Install PostgreSQL locally on the same server by following the PostgreSQL installation documentation.
Use an external PostgreSQL database server. Ensure you have connection credentials, including hostname, port, database name, username, and password available.
Use a managed database service.
Step 2: Prepare the database
Follow the database preparation documentation to set up your PostgreSQL database for Mattermost.
Step 3: Download the latest Mattermost Server tarball
In a terminal window, ssh onto the system that will host the Mattermost Server. Using wget, download the Mattermost Server release you want to install using one of the following commands. Replace amd64 with the appropriate architecture (e.g., arm64 for ARM-based systems) in the link as needed.
wget https://releases.mattermost.com/11.9.0/mattermost-11.9.0-linux-amd64.tar.gz
wget https://releases.mattermost.com/11.7.7/mattermost-11.7.7-linux-amd64.tar.gz
If you are looking for an older release, Enterprise and Team Edition releases can be found in our version archive documentation.
Step 4: Install Mattermost server
Ahead of installing the Mattermost Server, we recommend updating all your repositories and, where required, update existing packages by running the following commands:
sudo dnf update
sudo dnf upgrade
After any updates, and any system reboots, are complete, install the Mattermost Server by extracting the tarball, creating users and groups, and setting file/folder permissions.
First extract the tarball:
tar -xvzf mattermost*.gz
Now move the entire folder to the
/optdirectory (or whatever path you require):sudo mv mattermost /opt
Create the default storage folder. By default the Mattermost Server uses
/opt/mattermost/dataas the folder for files. This can be changed in the System Console during setup (even using alternative storage such as S3):sudo mkdir /opt/mattermost/data
Note
If you choose a custom path, ensure this alternate path is used in all steps that follow.`
Set up a user and group called
mattermost:
sudo useradd --system --user-group mattermost
Note
If you choose a custom user and group name, ensure it is used in all the steps that follow.
Set the file and folder permissions for your installation:
sudo chown -R mattermost:mattermost /opt/mattermost
Give the
mattermostgroup write permissions to the application folder:
sudo chmod -R g+w /opt/mattermostYou will now have the latest Mattermost Server version installed on your system. Starting and stopping the Mattermost Server is done using
systemd.
Create the systemd unit file:
sudo touch /lib/systemd/system/mattermost.service
As root, edit the systemd unit file at
/lib/systemd/system/mattermost.serviceto add the following lines:
[Unit]
Description=Mattermost
After=network.target

[Service]
Type=notify
ExecStart=/opt/mattermost/bin/mattermost
TimeoutStartSec=3600
KillMode=mixed
Restart=always
RestartSec=10
WorkingDirectory=/opt/mattermost
User=mattermost
Group=mattermost
LimitNOFILE=49152

[Install]
WantedBy=multi-user.target
Save the file and reload systemd using
sudo systemctl daemon-reload. Mattermost Server is now installed and is ready for setup.
Step 5: Set up the server
Before you start the Mattermost Server, you need to edit the configuration file. A default configuration file is located at /opt/mattermost/config/config.json. We recommend taking a backup of this default config ahead of making changes:
sudo cp /opt/mattermost/config/config.json /opt/mattermost/config/config.defaults.json
Configure the following properties in this file:
Under
SqlSettings, setDriverNameto"postgres". This is the default and recommended database for all Mattermost installations.Under
SqlSettings, setDataSourceto"postgres://mmuser:<mmuser-password>@<host-name-or-IP>:5432/mattermost?sslmode=disable&connect_timeout=10"replacingmmuser,<mmuser-password>,<host-name-or-IP>andmattermostwith your database name.Under
ServiceSettings, set"SiteURL": The domain name for the Mattermost application (e.g.https://mattermost.example.com).
Note
We recommend configuring the Support Email under SupportSettings, set "SupportEmail". This is the email address your users will contact when they need help.
After modifying the config.json configuration file, you can now start the Mattermost server:
sudo systemctl start mattermost
Verify that Mattermost is running: curl http://localhost:8065. You should see the HTML that’s returned by the Mattermost Server.
The final step, depending on your requirements, is to run sudo systemctl enable mattermost.service so that Mattermost will start on system boot. If you don’t receive an error when starting Mattermost after the previous step, you are good to go. If you did receive an error, continue on.
Hardened RHEL environments
When deploying Mattermost on hardened RHEL systems, additional security configurations may be required. Select the tab below for your specific security tool:
When deploying Mattermost from RHEL9, which has SELinux running with enforcing mode enabled by default, additional configuration is required.
SELinux is a security module that provides access control security policies. It’s enabled by default on RHEL and CentOS systems. SELinux can block access to files, directories, and ports, which can cause issues when starting Mattermost. To resolve these issues, you’ll need to set the appropriate SELinux contexts for the Mattermost binaries and directories, and allow Mattermost to bind to ports.
Ensure that SELinux is enabled and in enforcing mode by running the sestatus command. If it’s enforcing, you’ll need to configure it properly.
Set bin contexts for /opt/mattermost/bin
SELinux enforces security contexts for binaries. To label the Mattermost binaries as safe, you’ll need to set them to the below SELinux context.
sudo semanage fcontext -a -t bin_t "/opt/mattermost/bin(/.*)?"
sudo restorecon -RF /opt/mattermost/bin
Now, try starting Mattermost again with
sudo systemctl start mattermost
If you don’t receive an error, verify that Mattermost is running: curl http://localhost:8065. You should see the HTML that’s returned by the Mattermost Server. You’re all set!
If on starting Mattermost you receive an error, before moving on, check for the existence of a file in /opt/mattermost/logs - if mattermost.log exists in that directory, it’s more likely you’re dealing with a configuration issue in config.json. Double check the previous steps before continuing.
Try different contexts for /opt/mattermost
SELinux enforces security contexts for files and directories. To label your Mattermost directory as safe, you’ll need to set an appropriate SELinux context.
Check current context by running
ls -Z /opt/mattermost. When you see something likedrwxr-xr-x. root root unconfined_u:object_r:default_t:s0 mattermostreturned, thedefault_tindicates that SELinux doesn’t know what this directory is for.Set a safe context by assigning a SELinux type that’s compatible with web services or applications by running
sudo semanage fcontext -a -t httpd_sys_content_t "/opt/mattermost(/.*)?". A common one ishttpd_sys_content_t, used for serving files. Ensure you match the directory and its contents recursively. Run thesudo restorecon -R /opt/mattermostto apply the changes.
Allow Mattermost to bind to ports
When Mattermost needs specific ports (e.g., 8065), ensure that SELinux allows it by allowing Mattermost to bind to ports. Run the sudo semanage port -l | grep 8065 command, and if the port’s not listed, you’ll need to add it by running sudo semanage port -a -t http_port_t -p tcp 8065, replacing the 8065 with the required port.
Handle custom policies
If Mattermost requires actions that SELinux blocks, you’ll need to generate a custom policy.
Check for SELinux denials first in the logs by running
sudo ausearch -m avc -ts recent, or by checking the audit log:sudo cat /var/log/audit/audit.log | grep denied.If needed, generate a policy module by installing
audit2allowto generate policies automatically.
sudo yum install -y policycoreutils-python-utils
sudo grep mattermost /var/log/audit/audit.log | audit2allow -M mattermost_policy
sudo semodule -i mattermost_policy.pp
Test the configuration
Restart Mattermost to confirm the configuation works as expected by running sudo systemctl restart mattermost. In the case of failures, revisit the logs to identify other SELinux-related issues.
Need Mattermost working quickly for testing purposes?
You can change SELinux to permissive mode by running the
sudo setenforce 0. command where policies aren’t enforced, only logged.This command changes the SELinux mode to “permissive”. While in permissive mode, policies aren’t enforced, and violations are logged instead of being blocked. This can be helpful for debugging and troubleshooting issues related to SELinux policies.
Ensure you re-enable enforcing mode once context is working as needed by running the
sudo setenforce 1command.
Additional resources
When deploying Mattermost on RHEL systems with firewalld enabled, you’ll need to configure firewall rules to allow access to the Mattermost Server.
Firewalld is the default firewall management tool on RHEL systems and provides a dynamically managed firewall with support for network zones. By default, it may block incoming connections to Mattermost’s port (8065).
Check if firewalld is running
sudo systemctl status firewalld
If firewalld is active, configure it to allow Mattermost traffic.
Configure firewalld for Mattermost Server
Open port 8065 for Mattermost Server:
sudo firewall-cmd --permanent --add-port=8065/tcp
If you’re using a reverse proxy (e.g., nginx or Apache) on the same server, also open HTTP and HTTPS ports:
sudo firewall-cmd --permanent --add-service=http
sudo firewall-cmd --permanent --add-service=https
Reload firewalld to apply the changes:
sudo firewall-cmd --reload
Verify the configuration:
sudo firewall-cmd --list-allYou should see port 8065/tcp (and optionally http/https services) in the output.
Note
If you’re using a custom port for Mattermost, replace 8065 with your configured port number. The --permanent flag ensures the rules persist after system reboots.
Configure firewalld for Mattermost Calls (optional)
If you’re deploying the Mattermost Calls plugin or the standalone rtcd service, additional ports need to be opened. See the Calls deployment guide documentation for details on Calls architecture and deployment modes.
For integrated Calls plugin (running alongside Mattermost):
sudo firewall-cmd --permanent --add-port=8443/udp
sudo firewall-cmd --permanent --add-port=8443/tcp
sudo firewall-cmd --reload
For standalone rtcd service (requires additional API port):
sudo firewall-cmd --permanent --add-port=8443/udp
sudo firewall-cmd --permanent --add-port=8443/tcp
sudo firewall-cmd --permanent --add-port=8045/tcp
sudo firewall-cmd --reload
Note
Port 8443 (UDP/TCP) is used for RTC media traffic (audio/video/screen sharing)
Port 8045 (TCP) is used for API communication between Mattermost and rtcd service
TCP support for RTC requires Calls v0.17+ and rtcd v0.11+
If you’re using custom ports, replace the default port numbers with your configured values
When deploying Mattermost on RHEL systems with fapolicyd enabled, you may encounter “operation not permitted” errors in the Mattermost logs.
Fapolicyd (File Access Policy Daemon) is a userspace daemon that determines access rights to files based on trust. It’s commonly enabled in secure environments to prevent execution of unauthorized binaries. By default, fapolicyd may block Mattermost binaries and plugins from executing.
Troubleshoot fapolicyd issues
If you’re seeing “operation not permitted” errors in your Mattermost logs, first check if fapolicyd is the cause by temporarily stopping it:
sudo systemctl stop fapolicyd
Test your Mattermost deployment. If it works now, fapolicyd is blocking Mattermost execution and you need to configure it properly.
Start fapolicyd in debug mode to identify what’s being denied:
sudo fapolicyd --debug
Look for denial messages in the output. They will look similar to:
rule=15 dec=deny_audit perm=execute auid=-1 pid=19735
  exe=/opt/mattermost/bin/mattermost : path=/opt/mattermost/plugins/focalboard/server/dist/plugin-linux-amd64
  ftype=application/x-executable trust=0
Note the rule number that’s denying execution - your rule file must be numbered to come before this rule.
Configure fapolicyd to allow Mattermost
Create a rule file for Mattermost. The naming convention is critical - it must come before the rule that’s denying Mattermost. If you’re using a stock fapolicyd configuration,
80works fine:
sudo touch /etc/fapolicyd/rules.d/80-mattermost.rules
Add the allow rules to the file:
sudo vi /etc/fapolicyd/rules.d/80-mattermost.rulesAdd the following rules to allow Mattermost execution:
allow perm=execute exe=/usr/bin/sudo trust=1 : dir=/opt/mattermost/ all trust=0
allow perm=execute exe=/opt/mattermost/bin/mattermost : dir=/opt/mattermost all trust=0
allow perm=execute exe=/usr/lib/systemd/systemd trust=1 : dir=/opt/mattermost/ all trust=0
Check that the rules are valid and will be applied:
sudo fagenrules --checkYou should see “Rules have changed and should be updated” in the output.
Load the new rules:
sudo fagenrules --load
Restart the fapolicyd service:
sudo systemctl restart fapolicyd
Restart Mattermost to verify it works correctly:
sudo systemctl restart mattermost
Verify that Mattermost is running without errors:
curl http://localhost:8065
sudo systemctl status mattermost
Note
The rule file numbering is critical. Rules are processed in order, and your allow rules must come before any deny rules. If you continue to see denials after following these steps, check your deny rule number (from the debug output) and ensure your rule file number is lower.
If you have plugins that execute binaries (like Playbooks or the Calls plugin), the fapolicyd rules above allow execution of any binaries within the
/opt/mattermostdirectory. If you need more restrictive rules, you can create specific rules for each plugin binary.
Configure fapolicyd for rtcd service (optional)
If you’re deploying the standalone rtcd service for Mattermost Calls, you’ll need separate fapolicyd rules for the rtcd binary. The rtcd service is deployed separately from Mattermost and runs its own binary. See the Calls deployment guide documentation for details on when and why to use rtcd.
Create a rule file for rtcd. The naming convention is critical - it must come before the deny rule (typically 80 works):
sudo touch /etc/fapolicyd/rules.d/80-rtcd.rules
Add the allow rules for rtcd:
sudo vi /etc/fapolicyd/rules.d/80-rtcd.rulesAdd the following rules (adjust paths based on your rtcd installation directory):
allow perm=execute exe=/usr/bin/sudo trust=1 : dir=/opt/rtcd/ all trust=0
allow perm=execute exe=/opt/rtcd/bin/rtcd : dir=/opt/rtcd all trust=0
allow perm=execute exe=/usr/lib/systemd/systemd trust=1 : dir=/opt/rtcd/ all trust=0
Check that the rules are valid and will be applied:
sudo fagenrules --checkYou should see “Rules have changed and should be updated” in the output.
Load the new rules:
sudo fagenrules --load
Restart fapolicyd and the rtcd service:
sudo systemctl restart fapolicyd
sudo systemctl restart rtcd
Verify that rtcd is running without errors:
sudo systemctl status rtcd
Note
The paths shown above assume rtcd is installed in
/opt/rtcd/. Adjust these paths based on your actual rtcd installation directory.If you continue to see denials after following these steps, run
sudo fapolicyd --debugto identify the specific paths being denied and adjust your rules accordingly.See the RTCD setup and configuration documentation for installation and configuration details.
Additional resources
Mattermost and fapolicyd support article
Step 6: Update the server
Updating your Mattermost Server installation when using the tarball requires several manual steps. See the upgrade Mattermost Server documentation for details.
Remove Mattermost
To remove the Mattermost Server, you must stop the Mattermost Server, back up all important files, and then run this command:
sudo rm /opt/mattermost
Note
Depending on your configuration, there are several important folders in /opt/mattermost to backup. These are config, logs, plugins, client/plugins, and data. We strongly recommend you back up these locations before running the rm command.
You may also remove the Mattermost systemd unit file and the user/group created for running the application.
Mattermost is published as an Azure Marketplace solution that provisions a production-ready Mattermost stack in your own subscription using Azure-managed services for compute, database, shared file storage, and load balancing. This option is intended for organizations that want a resilient Mattermost deployment they can scale and operate within their existing Azure tenant.
Prerequisites
An active Azure subscription with the Owner or Contributor role on the subscription (required to purchase and deploy Azure Marketplace solutions), permission to create resource groups, and permission to accept Azure Marketplace billing terms for the offer.
Familiarity with the Azure portal (resource groups, networking, virtual machines, and Application Gateway).
For multi-node deployments (more than one application instance), a valid Mattermost Enterprise license file. The license is optional for single-node deployments.
If you plan to enable HTTPS at deployment time:
A PFX (PKCS#12) certificate bundle and its password.
A custom domain (FQDN) that you will point to the Application Gateway after deployment.
What gets deployed
The template provisions a self-contained, production-ready stack in the resource group you select, including:
Virtual Machine Scale Set (Linux): Runs Mattermost on Ubuntu Pro 24.04 LTS images published by Mattermost. Instance count and VM size are driven by the scaling tier you choose.
Application Gateway with public IP: Acts as the entry point for Mattermost traffic, with optional HTTPS listener (using your PFX certificate) and HTTP-to-HTTPS redirection when HTTPS is enabled.
Azure Database for PostgreSQL Flexible Server: Managed PostgreSQL service that stores Mattermost data, with optional same-zone or zone-redundant high availability, backup retention and geo-redundancy.
Azure Files (NFS) with private endpoint: Shared storage for Mattermost data (uploads, plugins, and other shared files), reachable only from inside the virtual network.
Virtual network and subnets: A dedicated VNet for the deployment, with separate subnets for the Application Gateway, the Mattermost application instances, the database, and the storage private endpoint.
NAT gateway: Provides controlled outbound internet access for the application instances (for example, to fetch packages and the Mattermost configuration scripts).
Private DNS zones: Used to resolve the PostgreSQL Flexible Server and Azure Files private endpoint from inside the VNet.
Step 1: Select a plan and start creation
Open the Mattermost - Azure-Native (VM-based) offer in the Azure Marketplace, click Get it now, select the plan, and then click Create to open the deployment wizard.
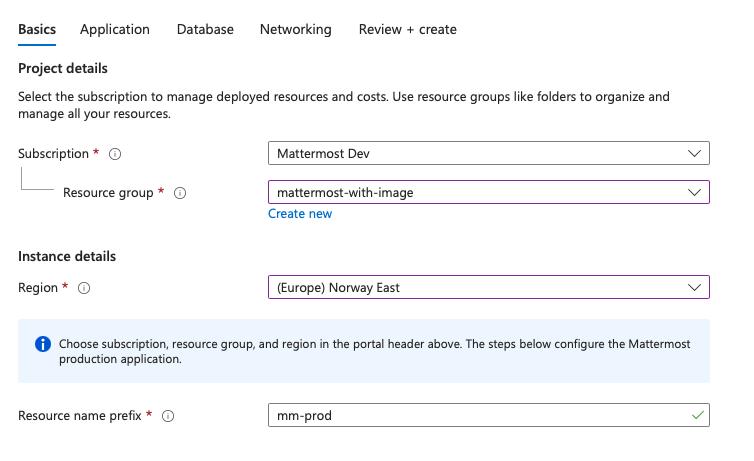
Step 2: Basics
On the Basics tab, configure the following:
Subscription: Choose the Azure subscription where the deployment will live.
Resource group: Select an existing resource group or create a new one. A new resource group keeps the production stack easy to manage and clean up.
Region: Select the deployment region. Choose a region that supports the PostgreSQL Flexible Server SKUs you plan to use, and that has the availability zones you need if you intend to enable PostgreSQL high availability.
Resource name prefix: Short prefix (2–12 lowercase letters, digits, or hyphens) used to name the Azure resources created by the template (for example,
mm-prod).
Step 3: Application
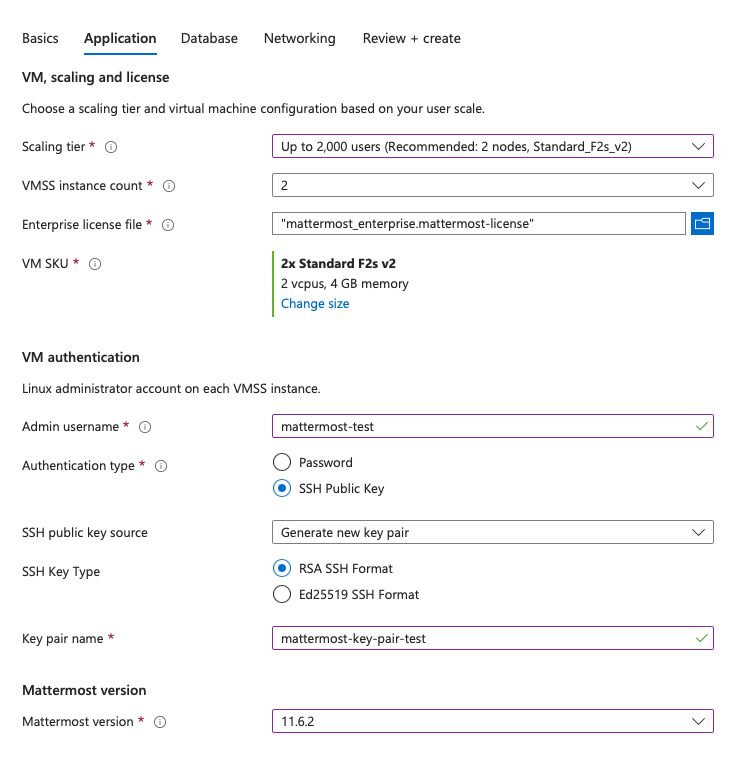
On the Application tab, configure how the Mattermost application is sized and how administrators access the VMs.
Scaling tier: Pick the user scale you are planning for. The wizard uses this to suggest sensible defaults for the VMSS instance count, VM size, and PostgreSQL SKU, and to determine whether read replicas are created for the database. The dropdown shows the recommended node count and VM SKU for each tier. For the underlying sizing rationale, see available reference architectures.
VMSS instance count: Number of Mattermost application nodes (1–5). Defaults to the suggested value for your scaling tier; adjust if needed.
Enterprise license file: Required when the instance count is greater than 1 (multi-node high-availability clustering). Upload your Mattermost Enterprise license file. The license is optional for single-node deployments.
VM SKU: Size of each VMSS instance. The wizard surfaces recommended Linux sizes first; you can select any supported Linux size available in your region.
Admin username: Linux administrator account used to sign in to the VM instances.
Authentication type: Choose Password or SSH public key for Linux sign-in. SSH public key is recommended for production deployments.
Mattermost version: The Mattermost version to install (for example,
11.6.2). See the Mattermost release policy for supported versions.
Step 4: Database
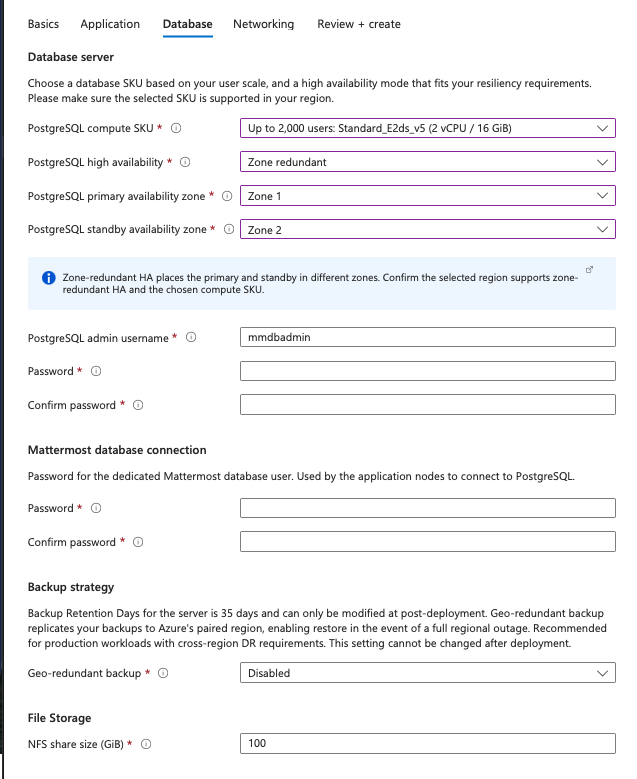
On the Database tab, configure the managed PostgreSQL service and the shared NFS file share.
PostgreSQL compute SKU: Memory-optimized Flexible Server SKU. Defaults to the SKU recommended for your scaling tier; pick a SKU that is supported in your region. Available choices are
Standard_E2ds_v5,Standard_E4ds_v5, andStandard_E8ds_v5.PostgreSQL high availability: Choose how PostgreSQL is made resilient:
Disabled: Single primary instance. Suitable for small deployments.
Same zone: Primary and standby in the same availability zone.
Zone redundant: Primary and standby in different availability zones.
For regional support of Flexible Server SKUs and HA modes, see Azure regions for PostgreSQL Flexible Server.
Primary availability zone and standby availability zone: Shown when HA is enabled. For zone-redundant HA, the primary and standby zones must be different. Pick zones supported in your region for the PostgreSQL SKU you chose.
PostgreSQL admin username and password: Administrator credentials for the Flexible Server. Avoid reserved names such as
azure_superuser. The password must meet Azure Flexible Server password complexity requirements.Mattermost database user password: In the Mattermost database connection section, set the password for the dedicated Mattermost database user that the application nodes use to connect to PostgreSQL. This is separate from the PostgreSQL administrator credentials. The password must meet the same complexity rules as the admin password.
Geo-redundant backup: Replicates PostgreSQL backups to Azure’s paired region for cross-region disaster recovery. This setting cannot be changed after deployment.
NFS share size (GiB): Size of the Azure Files (NFS) share used by Mattermost for shared application data. Minimum 100 GiB.
Note
Backup retention for PostgreSQL is set to 35 days at deployment time. You can change retention from the Azure portal after the deployment completes.
Step 5: Networking
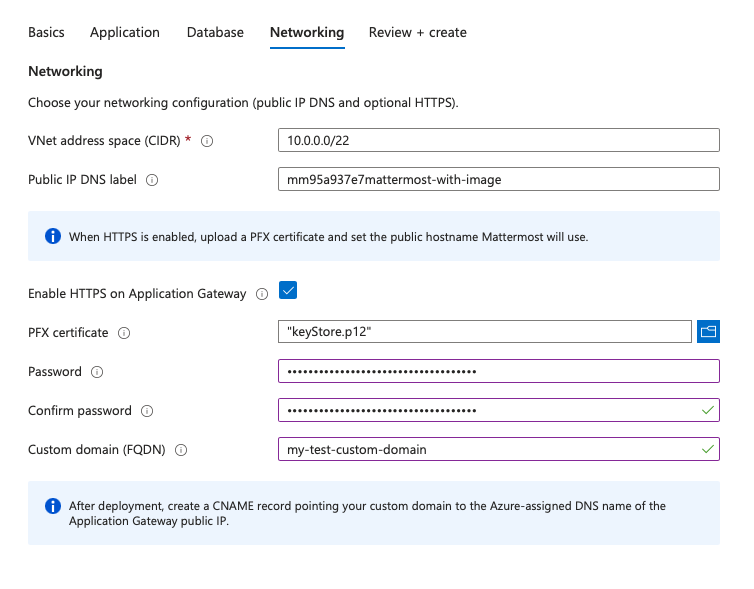
On the Networking tab, configure the virtual network and how Mattermost is exposed to users.
VNet address space (CIDR): The address space for the virtual network created by the template. Defaults to
10.0.0.0/22. Pick a range that does not overlap with other VNets you plan to peer with.Public IP DNS label: You must set a DNS prefix (label) that is globally unique across Azure public cloud; it forms part of your URL and allows public access to your workspace. If the label is already taken, deployment will fail.
Enable HTTPS on Application Gateway: When enabled, the Application Gateway terminates TLS using your PFX certificate and HTTP traffic is redirected to HTTPS. When disabled, Mattermost is served over HTTP on the Azure-assigned hostname (suitable for testing, not recommended for production).
PFX certificate and PFX password: Shown when HTTPS is enabled. Upload your PKCS#12 bundle and provide the password used to protect it.
Custom domain (FQDN): Shown when HTTPS is enabled. The public hostname Mattermost will use (for example,
mattermost.example.com). After deployment, point this hostname to the Azure-assigned DNS name of the Application Gateway public IP (typically using a CNAME record for subdomains).
Step 6: Review and create
Review your settings, accept any Marketplace terms if prompted, then select Create. Provisioning typically takes 20–50 minutes, depending on your PostgreSQL configuration. Allow a few additional minutes after Azure reports the deployment as Succeeded before the application is reachable.
After deployment completes:
In the Azure portal, open the resource group you used.
Open the public IP resource attached to your Application Gateway (often named
<prefix>-ag-pip). Under Essentials, note the DNS name (Azure-assigned FQDN).If you deployed without HTTPS, your site URL is:
http://<dns-label>.<region>.cloudapp.azure.comIf you deployed with HTTPS, create a DNS record that points your custom domain to the Azure-assigned DNS name of the Application Gateway public IP (typically CNAME for subdomains; use your provider’s apex-compatible record type if using a root domain). Once DNS propagates, your site URL is:
https://<your-custom-domain>
Congratulations! You’ve successfully deployed a production-ready Mattermost stack on Azure.
Next steps
For sizing guidance and reference architectures, see high-availability-cluster-based-deployment and server architecture.
For ongoing operations (upgrades, backups, monitoring), follow the standard Mattermost server administration documentation.
Runbooks
Upgrade Mattermost server
The VM scale set runs a Mattermost Marketplace VM image matching the version you selected in Step 3. Mattermost publishes new image versions for each supported release. To upgrade, point the VMSS at a newer image version in your deployment region. Application data stays in PostgreSQL and on the Azure Files share; the upgrade rolls application instances to VMs built from the updated image.
Before you upgrade
Review the important upgrade notes, and prepare to upgrade for the target version.
Confirm PostgreSQL backups are current and that you can restore if needed.
Pick a target version from the Mattermost release policy.
Upgrade steps
Update the VMSS to the new image version:
az vmss update \
  --resource-group <resource-group> \
  --name <resource-name-prefix>-vmss \
  --set virtualMachineProfile.storageProfile.imageReference.version=<new-version>
The VMSS uses a rolling upgrade policy and an application health probe on
/api/v4/system/ping, so instances are replaced in batches while the Application Gateway keeps serving traffic to healthy nodes.Monitor the rollout in the Azure portal: open your VMSS → Instances (or Rolling upgrades) and wait until all instances are healthy and running the new model.
Verify Mattermost: Verify Mattermost uses the new version via System Console → About.
Secure your Mattermost deployment
Configuring TLS and setting up an NGINX proxy ensures secure communication between clients and your Mattermost server. This setup allows you to serve HTTPS traffic while proxying requests to Mattermost. You don’t need TLS enabled within Mattermost itself as NGINX will handle HTTPS traffic.
Install NGINX on the host server. See the set up NGINX proxy documentation for details.
Obtain a TLS certificate from a trusted certificate authority (CA) or use a self-signed certificate for testing purposes.
Configure NGINX with TLS certificates to serve HTTPS traffic. NGINX serves as a proxy, forwarding requests to the Mattermost application running locally or on a separate server.
Note
See the deployment troubleshooting documentation for resolutions to common deployment issues.