Configure SAML with Keycloak
The following process provides steps to configure SAML with Keycloak for Mattermost.
See the encryption options documentation for details on what encryption methods Mattermost supports for SAML.
Set up Keycloak for Mattermost SSO
Note
This was tested with Keycloak v26.4.0. We recommend adding Mattermost as a client to your primary realm.
Log in to Keycloak as an administrator.
Select Clients, then Create client. You’ll use this client ID in a later step.
Client type:
SAMLClient ID:
mattermost
Click Next and update the following values:
Root URL:
http://your-mattermost-url.comHome URL:
/login/sso/samlValid redirect URIs:
/login/sso/saml
Save the client.
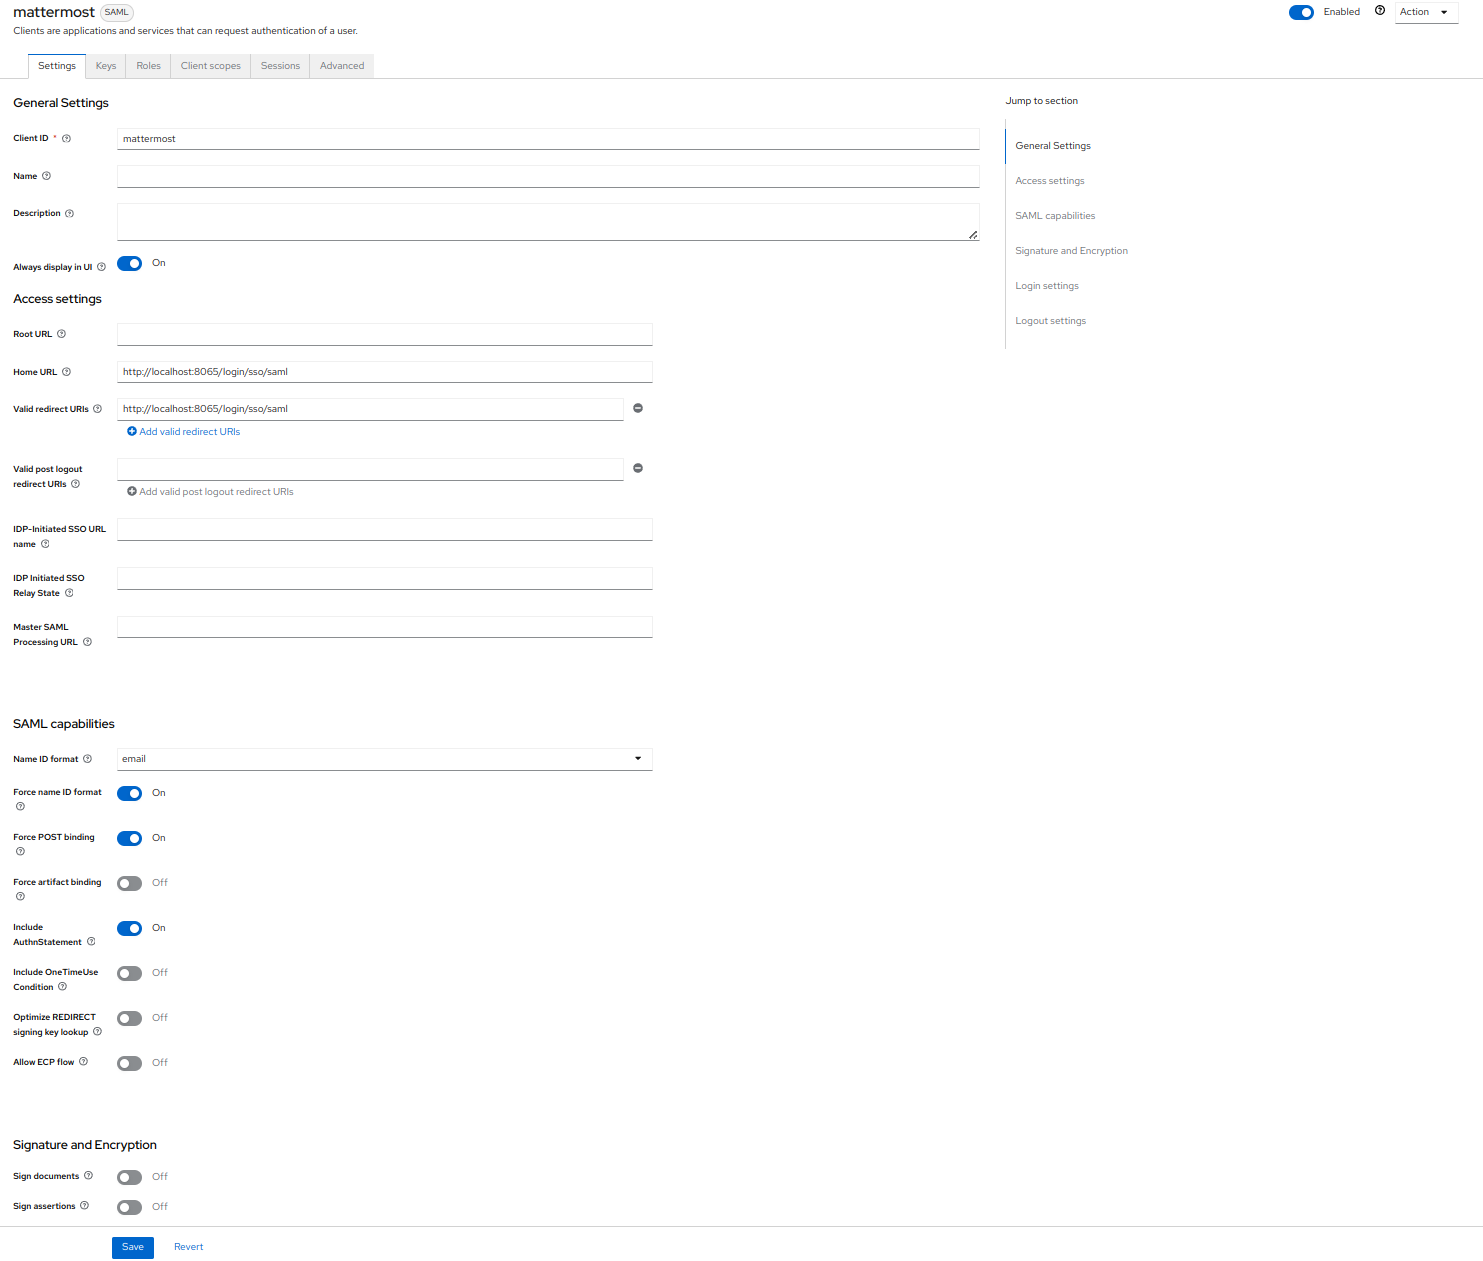
Under the Settings tab, update the following values:
Enabled: On
Name ID format:
Force Name ID format: On
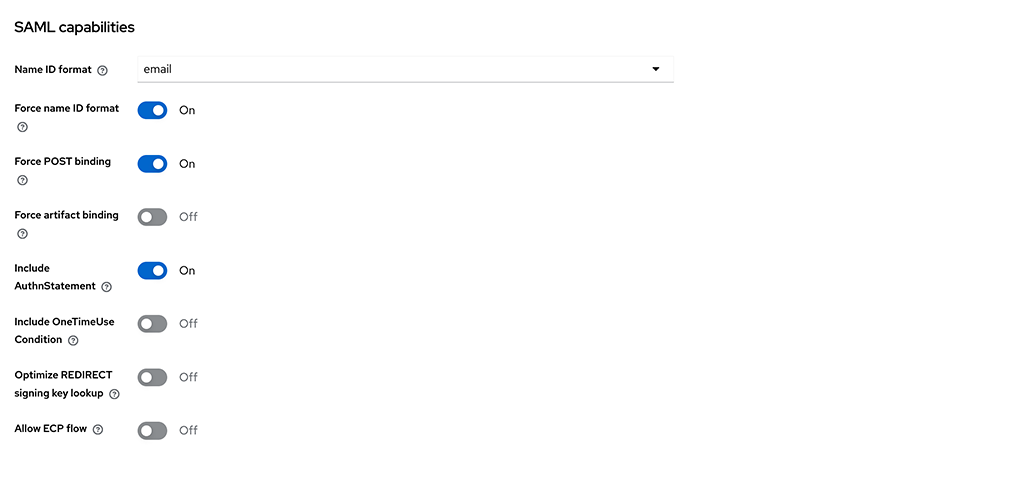
Under the Signature and Encryption section, update the following values:
Sign Documents: Off
Sign Assertions: On
Signature Algorithm:
RSA_SHA1SAML signature key name:
NONECanonicalization Method:
EXCLUSIVEEncryption Algorithm:
AES_256_GCMKey Transport Algorithm:
RSA_OAEP_MGF1PDigest method for RSA-OAEP:
SHA1
Warning
Mattermost only supports
RSA_SHA1for Keycloak SAML, because Keycloak is usingxmlencforRSA_SHA512andRSA_SHA256, wheras Mattermost currently only supportsxmldsig. So make sure to useRSA_SHA1as the Signature Algorithm and Digest Method as described in this section.
Navigate to the Keys tab.
Client signature required: Off
Encrypt Assertions: On
Click Generate
Download the private.key file.
Click Confirm
Warning
Mattermost does not support request signing with Keycloak so make sure to disable the Client signature setting as mentioned above.
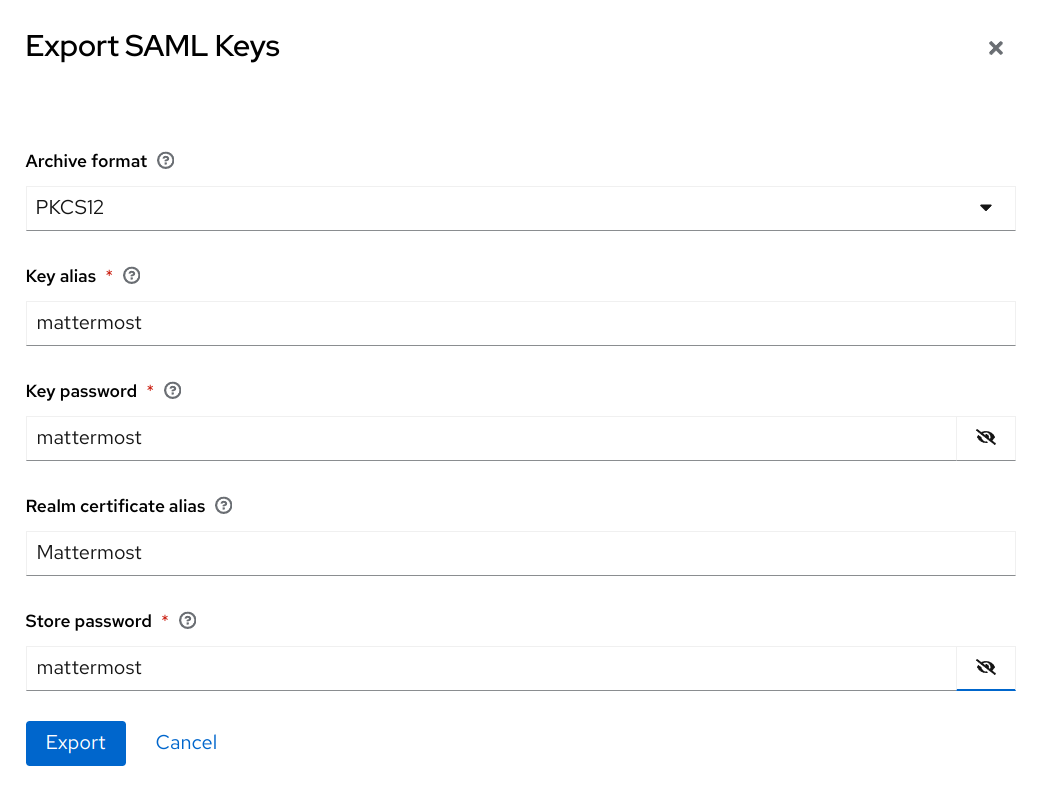
Next, click Export and update the following values and download the keystore.p12 file.
Archive Format:
PKCS12Key Alias:
mattermostKey Password:
mattermostStore Password:
mattermost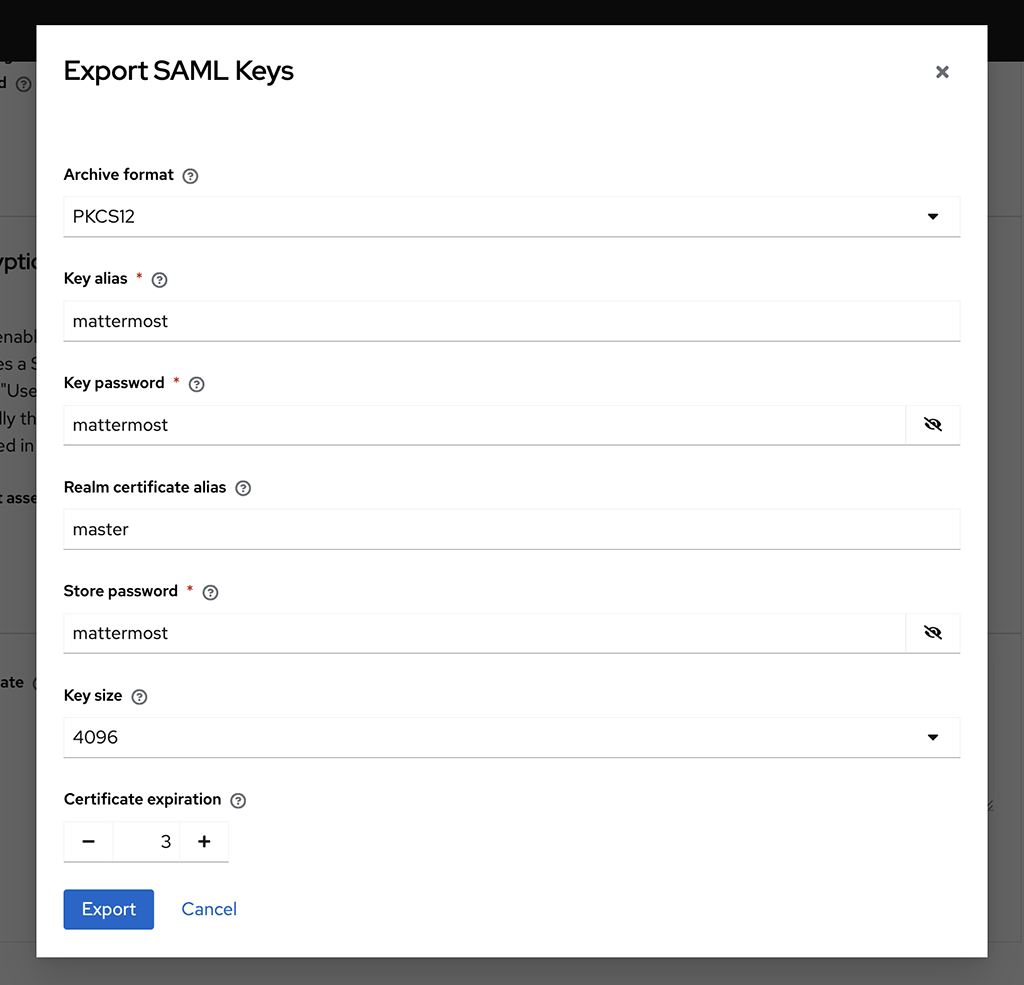
Navigate to the Client scopes tab.
First we add the predefined mappers for email, first name, and last name.
Select mattermost-dedicated
Click Add predefined mapper
Select the X500 email, X500 givenName, and X500 surname attributes.
Click Add.
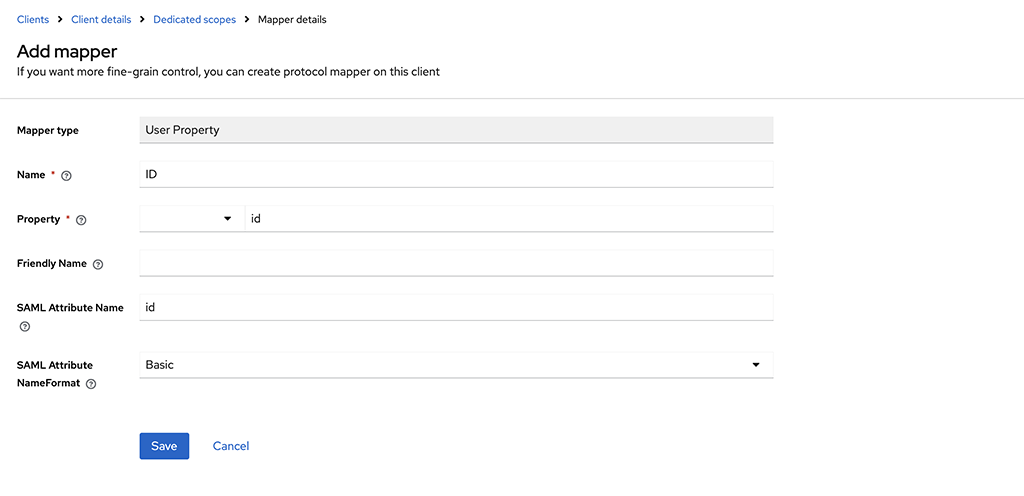
Next, we add the mappers for username and id.
Select Add Mapper -> By Configuration -> User Property.
Set Name to
Username.Set Property to
username(This is case sensitive and must be lowercase).Set SAML Attribute Name to
username.Select Save.

Repeat the above steps and use the custom property of
idto create the ID Attribute.
Note
If you’re planning to sync your SAML users with LDAP within Mattermost, the ID value used here must match with your Mattermost LDAP ID Attribute.
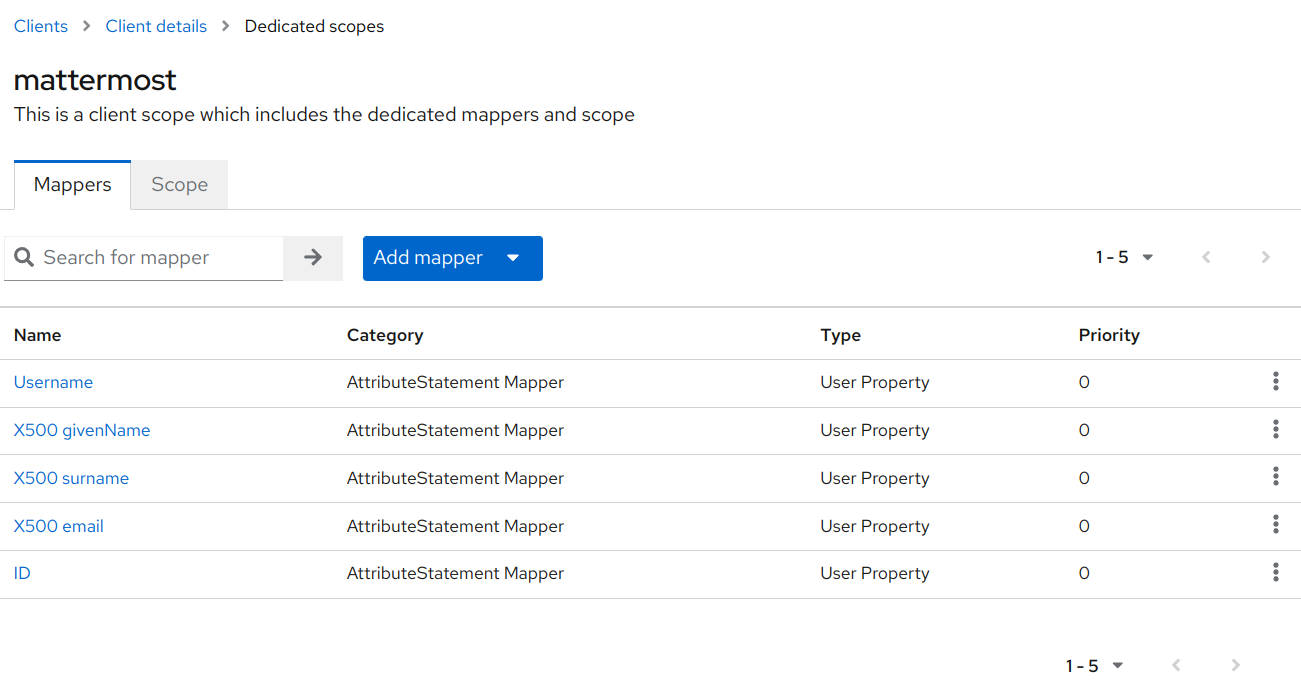
Once done your Mappers should look like this:
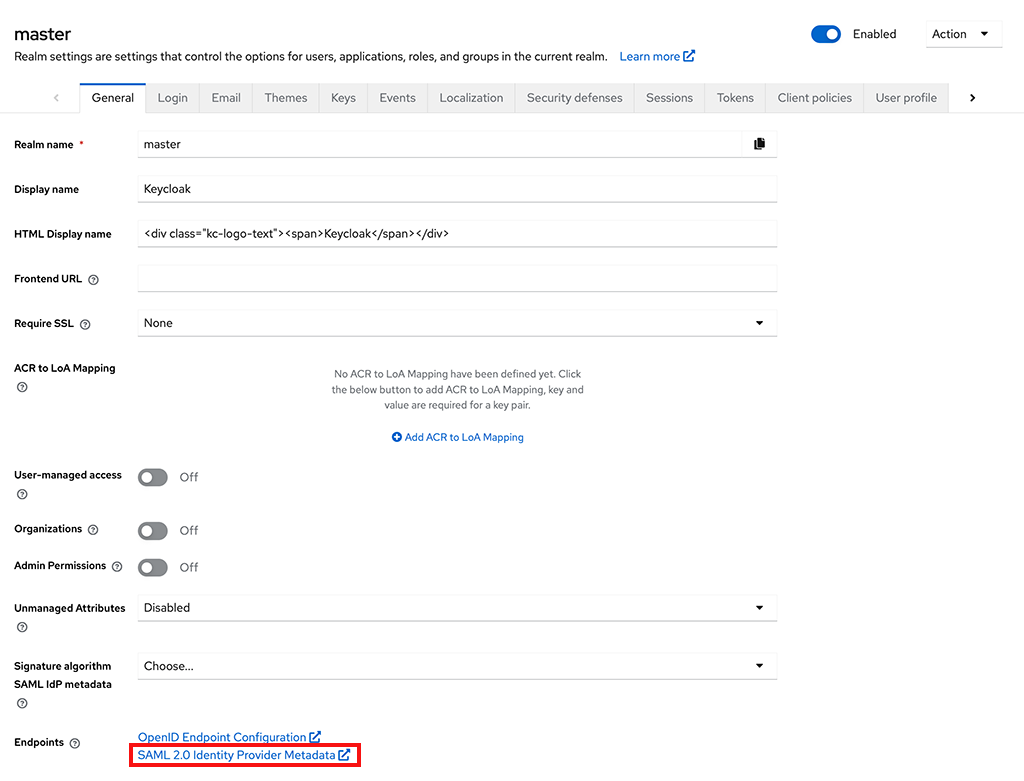
Get the metadata URL from Keycloak:
Within your Realm, select Realm Settings.
At the bottom of the General tab you should see a SAML 2.0 Identity Provider Metadata endpoint. Right-click and copy this URL. Store for the next step.
Configure SAML in Mattermost
In the Mattermost System Console go to Authentication > SAML.
Set the Identity Provider Metadata URL to the value you copied from the step above and select Get SAML Metadata from IdP. The metadata import will populate fields related to your Keycloak configuration.
If you have any issues with this import, you can check the
mattermost.logfile for more information. Enable debug logging and try again.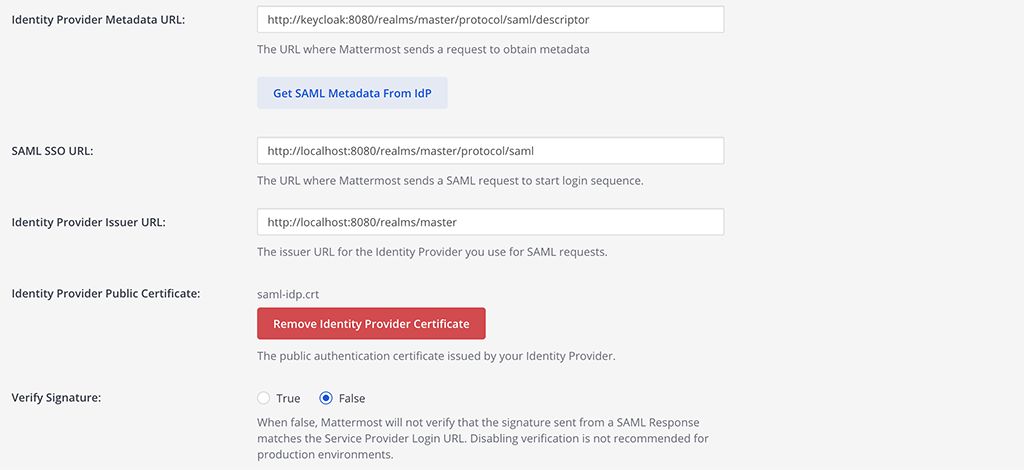
Note
If Mattermost does not correctly pull the Identity Provider Public Certificate you can manually add it by opening the metadata URL in a browser, copying the certificate value, and use a tool like OneLogin’s X.509 formatter that can format the certificate for you. Then save the correctly formatted certificate to a file and upload it to the Identity Provider Public Certificate field in the Mattermost System Console.
If Mattermost can not pull the metadata and is throwing a connection issue enable debug logging and see if you need to add your Keycloak url to the Allowed Untrusted Internal Connections list in the System Console under Environment > Developer and restart the server. See the Allowed Untrusted Internal Connections documentation for details.
Set the below fields:
Verify Signature: false
Service Provider Login URL:
http://your-mattermost-url.com/login/sso/samlService Provider Identifier:
mattermost
The Service Provider Identifier will match the Client ID that you configured in the second Keycloak step.

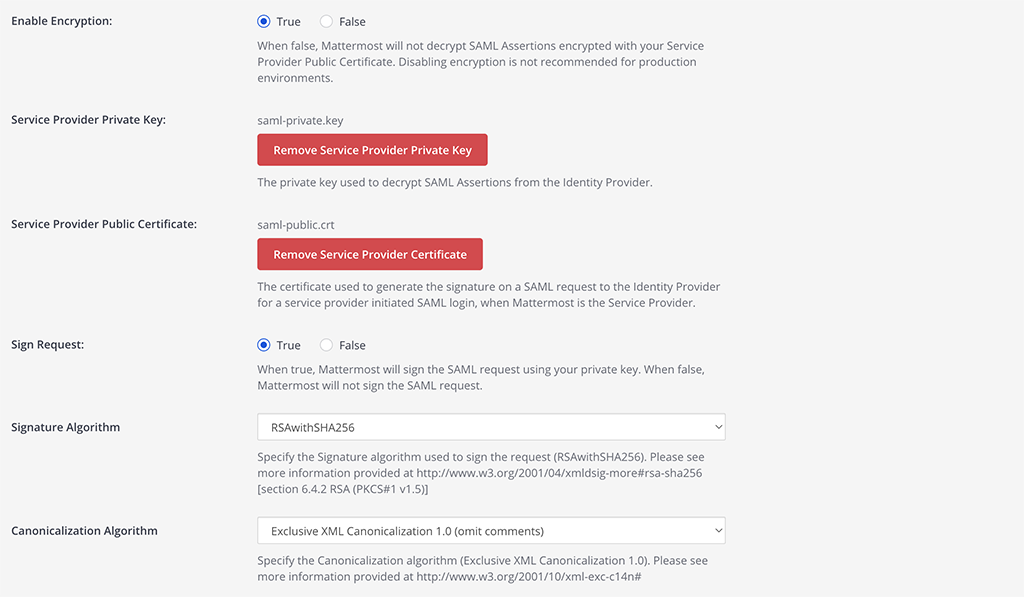
Configure the Encryption using the key you downloaded in step 6 of the Keycloak config.
Generate the
.crtfile from the.p12file.
openssl pkcs12 -password pass:mattermost -in keystore.p12 -out mattermost.crt -nodes -legacyGenerate the
.keyfile from the.p12file.
openssl pkcs12 -password pass:mattermost -in keystore.p12 -out mattermost.key -nodes -nocerts -legacyUpload both of these files within the Mattermost System Console. Make sure to select Upload.
Service Provider Private Key:
mattermost.keyService Provider Private Certificate:
mattermost.crtSign Request: true
Signature Algorithm:
RSAwithSHA256Canonicalization Algorithm:
Exclusive XML Canonicalization 1.0 (omits comments)
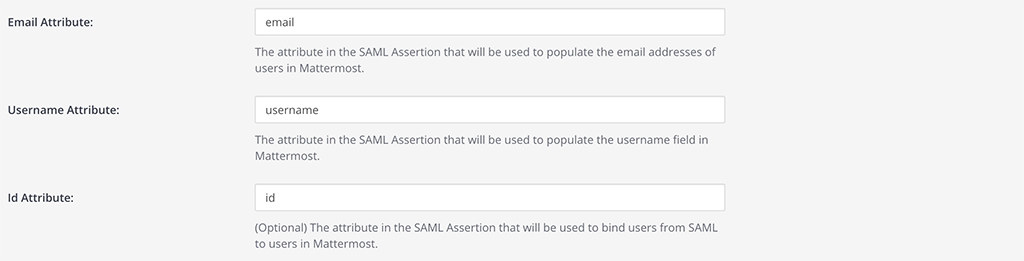
Set attributes for the SAML Assertions, which will update user information in Mattermost.
The attributes below are from steps 7 and 8 above. These values must be the SAML Attribute Name within Keycloak. See documentation on SAML configuration settings for more details.
Email Attribute:
emailUsername Attribute:
usernameId Attribute:
id
Select Save.
To confirm SAML is working correctly, log out of Mattermost or open Mattermost in a new Incognito Browser Window and select Sign in with SAML on the login page and login with an existing Keycloak account.
If you have existing users in Mattermost that are going to be migrated to SAML login, make sure to plan for user migration and update your users accordingly.
You may also configure SAML for Keycloak by editing config.json. Before starting the Mattermost server, edit config.json to enable SAML based on SAML configuration settings. You must restart the Mattermost server for the changes to take effect.
Configuing a SAML user as a Guest in Keycloak
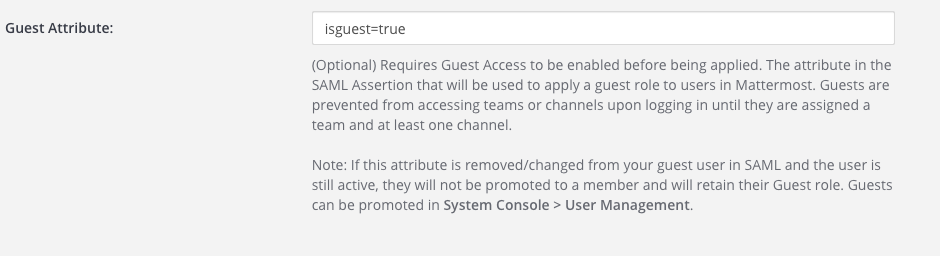
In Mattermost, go to System Console > Authentication > SAML.
Set the Guest Attribute to designate which SAML users are guests.
In the Keycloak administration interface, add a user attribute mapper for guests.
Select Clients from the LHS menu.
Select mattermost from the list.
Select the Client Scopes tab
Select mattermost dedicated from the list of scopes
Click the Add mapper drop down and select By configuration
Select User Attribute on the model that opens
Add values for Name, User Attribute and SAML Attribute Name as shown

In Keycloak specify which users are guest by adding the attribute under User details
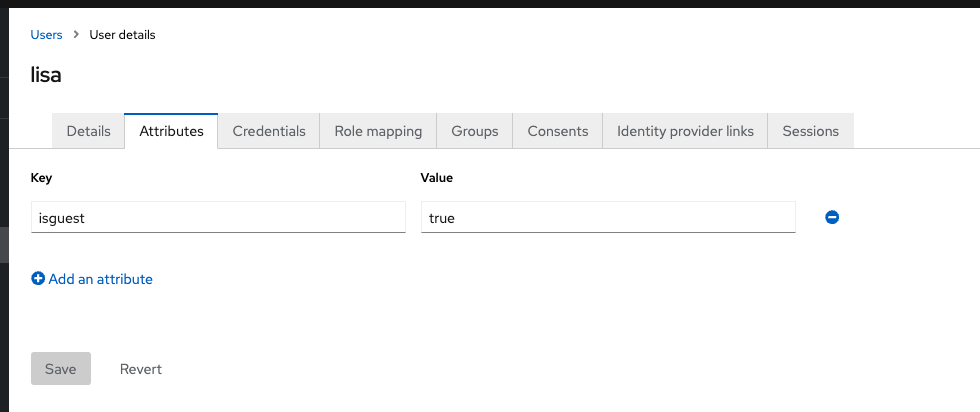
Select Users from the LHS menu.
Select the username of the desired user.
Select the Attribute tab and select + add an attribute.
Add the key and value.
Configure SAML synchronization with AD/LDAP
In addition to configuring SAML sign-in, you can optionally configure synchronizing SAML accounts with AD/LDAP. When configured:
Mattermost queries AD/LDAP for relevant account information and updates SAML accounts based on changes to attributes (first name, last name, and nickname)
Accounts disabled in AD/LDAP are deactivated in Mattermost, and their active sessions are revoked once Mattermost synchronizes attributes.
To configure SAML synchronization with AD/LDAP:
Go to System Console > Authentication > SAML 2.0, then set Enable Synchronizing SAML Accounts With AD/LDAP to true.
Go to System Console > Authentication > AD/LDAP to open the AD/LDAP wizard, navigate to the Connection Settings section, then set Enable Synchronization with AD/LDAP to true.
To ignore guest users when sychronizing, go to System Console > Authentication > SAML 2.0, then set Ignore Guest Users when Synchronizing with AD/LDAP to true.
Set the rest of the AD/LDAP settings based on configuration settings documentation to connect Mattermost with your AD/LDAP server.
If you don’t want to enable AD/LDAP sign-in, go to System Console > Authentication > AD/LDAP wizard, navigate to the Connection Settings section, then set Enable sign-in with AD/LDAP to false.
To specify how often Mattermost synchronizes SAML user accounts with AD/LDAP, go to System Console > Authentication > AD/LDAP wizard, navigate to the Sync Performance section, then set a Synchronization Interval in minutes. The default setting is 60 minutes. If you want to synchronize immediately after disabling an account, go to the Sync History section and select AD/LDAP Synchronize Now.
To confirm that Mattermost can successfully connect to your AD/LDAP server, go to System Console > Authentication > AD/LDAP wizard, navigate to the Connection Settings section, then select Test Connection.
Once the synchronization with AD/LDAP is enabled, user attributes are synchronized with AD/LDAP based on their email address. If a user with a given email address doesn’t have an AD/LDAP account, they will be deactivated in Mattermost on the next AD/LDAP sync.
To re-activate the account:
Add the user to your AD/LDAP server.
Purge all caches in Mattermost by going to System Console > Environment > Web Server, then select Purge All Caches.
Run AD/LDAP synchronization by going to System Console > Authentication > AD/LDAP wizard, navigating to the Sync History section, then select AD/LDAP Synchronize Now.
Purge all caches again in Mattermost by going to System Console > Environment > Web Server, then select Purge All Caches again. This re-activates the account in Mattermost.
Note
If a user is deactivated from AD/LDAP, they will be deactivated in Mattermost on the next sync. They will be shown as “Deactivated” in the System Console users list, all of their sessions will expire and they won’t be able to log back in to Mattermost.
If a user is deactivated from SAML, their session won’t expire until they’re deactivated from AD/LDAP. However, they won’t be able to log back in to Mattermost.
SAML synchronization with AD/LDAP is designed to pull user attributes such as first name and last name from your AD/LDAP, not to control authentication. In particular, the user filter cannot be used to control who can log in to Mattermost, this should be controlled by your SAML service provider’s group permissions.
See technical description of SAML synchronization with AD/LDAP for more details.
Override SAML data with AD/LDAP data
Alternatively, you can choose to override SAML bind data with AD/LDAP information. For more information on binding a user with the SAML ID Attribute, please refer to this documentation.
This process overrides SAML email address with AD/LDAP email address data or SAML Id Attribute with AD/LDAP Id Attribute if configured. We recommend using this configuration with the SAML ID Attribute to help ensure new users are not created when the email address changes for a user.
To ensure existing user accounts do not get disabled in this process, ensure the SAML IDs match the LDAP IDs by exporting data from both systems and comparing the ID data. Mapping ID Attributes for both AD/LDAP and SAML within Mattermost to fields that hold the same data will ensure the IDs match as well.
Set the SAML
Id Attributeby going to System Console > Authentication > SAML 2.0 > Id Attribute.Set System Console > Authentication > SAML 2.0 > Override SAML bind data with AD/LDAP information to true.
Set System Console > Authentication > SAML 2.0 > Enable Synchronizing SAML Accounts With AD/LDAP to true.
Run AD/LDAP sync by going to System Console > Authentication > AD/LDAP wizard, navigating to the Sync History section, then select AD/LDAP Synchronize Now.
Frequently Asked Questions
What encryption options are supported for SAML?
See the encryption options documentation for details on what encryption methods Mattermost supports for SAML.
How to bind authentication to Id attribute instead of email
Alternatively, you can use an Id attribute instead of email to bind the user. We recommend choosing an ID that is unique and will not change over time.
Configuring with an Id attribute allows you to reuse an email address for a new user without the old user’s information being exposed. For instance, if a user with an email address joe.smith@mattermost.com was once an employee, a new employee named Joe Smith can use the same email. This configuration is also useful when a user’s name changes and their email needs to be updated.
This process was designed with backwards compatibility to email binding. Here is the process applied to new account creations and to accounts logging in after the configuration:
A user authenticated with SAML is bound to the SAML service user using the Id Attribute (as long as it has been configured) or bound by email using the email received from SAML.
When the user tries to login and the SAML server responds with a valid authentication, then the server uses the “Id” field of the SAML authentication to search the user.
If a user bound to that ID already exists, it logs in as that user.
If a user bound to that ID does not exist, it will search base on the email.
If a user bound to the email exists, it logs in with email and updates the autentication data to the ID, instead of the email.
If a user bound to the ID or email does not exist, it will create a new Mattermost account bound to the SAML account by ID and will allow the user to log in.
Note
Existing accounts won’t update until they log in to the server.
Why does login fail with “one of the attributes is incorrect” / “<attribute> attribute is missing”?
A login failure with the error SAML login was unsuccessful because one of the attributes is incorrect. Please contact your System Administrator. — accompanied in the server logs by a detail such as email attribute is missing or name attribute is missing — means the assertion from your Identity Provider (IdP) did not contain an attribute whose name exactly matches what you configured in the Mattermost SAML attribute settings.
Mattermost matches each attribute by its full Name (or FriendlyName) as it appears in the assertion, character-for-character. The named attribute in the error message is the value you entered in Mattermost that could not be found.
This most often happens because the IdP sends attributes under a namespace. For example, Microsoft Entra ID emits its built-in claims under http://schemas.xmlsoap.org/ws/2005/05/identity/claims/ by default, so an attribute that looks like email in the Entra ID admin UI is actually sent in the assertion as http://schemas.xmlsoap.org/ws/2005/05/identity/claims/email. Entering only email in Mattermost will not match.
To resolve this:
Capture and decode the SAML response (for example, with the SAML-tracer browser extension) and read the
Nameattribute of each<Attribute>element in the<AttributeStatement>.Set each Mattermost attribute field to the exact
Namevalue from the assertion — including any namespace prefix — or reconfigure the IdP to emit the claim under the short name you want to use in Mattermost.
Can SAML via Microsoft ADFS be configured with Integrated Windows Authentication (IWA)?
Yes. IWA is supported on the browser, with support added to iOS and Android mobile apps in Q2/2019 (mobile apps v1.18 and later).
However, IWA is not supported on the Mattermost Desktop Apps due to a limitation in Electron. As a workaround you may create a browser desktop shortcut for quick access to Mattermost, just like a Desktop App.
Can I provision and deprovision users who log in via SAML?
Yes, but this relies on AD/LDAP to do so. Currently, we do not support SCIM. See “How do I deactivate users?” for more information.
How do I migrate users from one authentication method (e.g. email) to SAML?
See the mmctl user migrate-auth command documentation for details.
How is SAML different from OAuth 2.0 and OpenId Connect?
OAuth 2.0 was primarily intended for delegated authorization, where an app is authorized to access resources, such as Google contact list. It doesn’t deal with authentication.
OpenID Connect is built on top of OAuth 2.0, which supports authentication and thus direct SSO.
SAML is like OpenID Connect, except typically used in enterprise settings. OpenID Connect is more common in consumer websites and web/mobile apps.
Learn more at https://hackernoon.com/demystifying-oauth-2-0-and-openid-connect-and-saml-12aa4cf9fdba.